Stop Thermal Throttling: Expert Tips for Improving Gaming PC Cooling
Achieving optimal airflow and cooling in a gaming PC case is crucial to prevent thermal throttling, which can significantly degrade performance and shorten component lifespan.
For PC gamers, maintaining peak performance is paramount, but often, an invisible enemy lurks within their rigs: heat. Excessive heat can lead to what’s known as thermal throttling, a built-in safety mechanism that forces your components, like the CPU and GPU, to slow down to prevent damage. This not only sabotages your gaming experience with stuttering and lower frame rates but can also reduce the lifespan of your expensive hardware. Understanding how to combat this issue by improving airflow and cooling within your gaming case is not just an upgrade; it’s a necessity for any serious enthusiast.
Understanding Thermal Throttling and Its Impact
Thermal throttling is a protective measure embedded in modern processors and graphics cards. When these components reach a certain temperature threshold, they automatically reduce their clock speeds and power consumption to dissipate heat and avoid overheating. While essential for preventing permanent damage, this self-preservation comes at a significant cost: a noticeable drop in performance.
For gamers, this can manifest as sudden frame rate drops during intense gameplay, leading to a choppy and less immersive experience. It’s often mistaken for other issues like software glitches or network lag, but the root cause is frequently insufficient cooling. Long-term, consistent thermal throttling can also shorten the overall lifespan of your components, accelerating wear and tear due to prolonged exposure to high temperatures, even if they don’t fail outright.
Recognizing the Signs of Thermal Throttling
Identifying thermal throttling early can save you from frustration and potential hardware damage. While the most obvious sign is a sudden dip in performance during demanding tasks, here are some key indicators:
- Sudden, unexplained frame rate drops in games you previously ran smoothly.
- Increased fan noise, as your system’s fans work harder to dissipate heat.
- System instability, including crashes, freezes, or the infamous Blue Screen of Death.
- High component temperatures reported by monitoring software (e.g., CPU reaching 90°C+).
Regularly monitoring your CPU and GPU temperatures using software like HWMonitor or MSI Afterburner is a proactive step. Knowing your components’ safe operating temperatures is crucial; generally, temperatures consistently above 85°C (185°F) for extended periods indicate a need for better cooling solutions.
The impact of thermal throttling extends beyond just raw performance. It affects responsiveness, input lag, and the overall enjoyment of high-fidelity games. Imagine being in a critical moment of an online multiplayer game, only for your system to stutter due to heat, costing you a crucial advantage. This is why investing time and effort into optimizing your PC’s thermal management is as important as having powerful components themselves. It ensures that your hardware can consistently operate at its advertised speeds, delivering the smooth, uninterrupted gaming experience you paid for.
Strategic Case Selection for Optimal Airflow
The foundation of any effective cooling strategy begins with your PC case. While aesthetics often drive case selection, the internal layout and design for airflow are far more critical. A case with poor airflow can negate the benefits of even the most powerful cooling components, trapping hot air and creating thermal bottlenecks. Therefore, choosing the right case from the outset, or evaluating your current one, is a non-negotiable step in the fight against thermal throttling.
Modern gaming cases are designed with various airflow philosophies. Some prioritize a sleek, minimalist look, often at the expense of ventilation, while others embrace a more open, mesh-heavy design. For optimal cooling, particularly if you’re running high-performance components, prioritizing a case with ample mesh panels, particularly at the front and top, is advisable. These allow for unimpeded intake of cool air and exhaust of hot air.
Key Features of an Airflow-Optimized Case
- Mesh Front Panels: A solid front panel severely restricts airflow. Look for cases with large, unblocked mesh sections at the front to maximize cool air intake.
- Ample Fan Mounts: The more fan mounting options, the better. This allows for flexible fan configurations, supporting multiple intake and exhaust fans.
- Spacious Interior: A cramped case leads to air turbulence and hot spots. A spacious interior allows for better air movement around components and easier cable management.
- Good Cable Management Options: While seemingly minor, poor cable management can obstruct airflow. Cases with dedicated routes, tie-down points, and an ample gap behind the motherboard tray prevent cables from becoming internal obstacles.
Another often overlooked aspect is the type of dust filters. While essential for keeping your system clean, overly restrictive filters can impede airflow. Look for cases with easily removable and cleanable filters that offer a good balance between dust protection and air permeability. The internal layout, including the placement of drive cages and PSU shrouds, also plays a role. Ideally, these elements should not obstruct the primary path of airflow from front to back or bottom to top.
Investing in a high-quality, airflow-centric case pays dividends far beyond just lower temperatures. It contributes to a quieter system, as fans don’t need to spin as fast to maintain temperatures, and extends the lifespan of your valuable components. When considering a case, don’t just look at its exterior; delve into reviews that specifically discuss thermal performance and internal design to ensure it meets your cooling needs.
Mastering Fan Configuration and Placement
Once you have an airflow-friendly case, the next critical step is to configure your case fans effectively. It’s not just about adding more fans; it’s about strategic placement and understanding the principles of positive and negative air pressure. Proper fan configuration creates a directed airflow path, efficiently moving cool air in and hot air out, bypassing any stagnant hot spots.
The two primary airflow strategies are positive pressure and negative pressure. In a positive pressure setup, you have more air being pushed into the case than exhausted out. This creates a slightly higher internal pressure, forcing air out through all available openings, including small gaps, which helps to keep dust out. Conversely, a negative pressure setup involves more air being exhausted than intake, creating a slight vacuum inside that pulls air in through all openings, potentially drawing in more dust.
For most gaming setups, a balanced or slightly positive pressure configuration is generally recommended. This involves having more intake fans (typically at the front and bottom) than exhaust fans (usually at the rear and top). This creates a clear path for cool air to flow over your components before being expelled, while also reducing dust accumulation.
Optimal Fan Placement and Direction
Consider the following common and effective fan configurations:
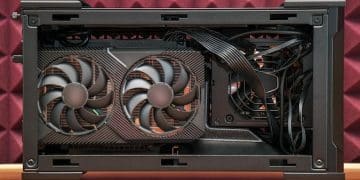
- Front Fans: Intake. These are crucial for drawing cool ambient air into the case, directly over your storage drives, GPU, and into the path of your CPU cooler.
- Rear Fan: Exhaust. Positioned at the back of the case, this fan expels the hot air generated from your CPU and surrounding components directly out of the system.
- Top Fans: Exhaust. Hot air rises, making top-mounted fans ideal for exhausting heat. If you have an AIO liquid cooler radiator, this is often the best placement for it.
- Bottom Fans: Intake (if applicable). Some cases allow for bottom-mounted intake fans, which can be particularly effective for providing cool air directly to your GPU.
The type of fan matters too. Static pressure fans are better for pushing air through restrictive environments like radiators, while airflow-optimized fans are better for moving large volumes of air in open spaces. Most case fans are a balance of both. Furthermore, fan size and RPM directly impact cooling performance and noise levels. Larger fans can move more air at lower, quieter RPMs. While it might seem intuitive to run all fans at maximum speed, finding a balance between cooling effectiveness and acceptable noise levels is key for daily use.
Don’t overlook fan control. Modern motherboards offer extensive fan control options within their BIOS or through software. Setting up custom fan curves based on temperature readings ensures that your fans only spin up when necessary, minimizing noise during less demanding tasks while ramping up when gaming initiates. Experimentation with fan configurations and monitoring temperatures is essential to discover the optimal setup for your specific case and components.
Upgrading Your CPU and GPU Cooling
While case airflow is paramount, the cooling solutions directly attached to your CPU and GPU are the frontline defenses against thermal throttling for these critical components. Stock coolers, while adequate for basic use, often fall short under heavy gaming loads, making aftermarket upgrades a worthwhile investment for any serious gamer. Choosing the right cooler for your specific hardware and usage patterns can significantly enhance performance stability and system longevity.
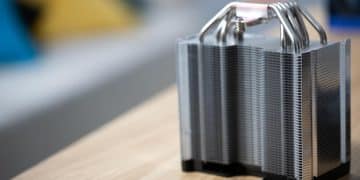
For CPUs, there are two primary cooling options: air coolers and AIO (All-In-One) liquid coolers. High-end air coolers, with their large heatsinks and multiple heat pipes, can offer performance comparable to many AIOs, often at a lower cost and with fewer points of failure. They are a robust and reliable choice, especially for those who prefer simpler installations and maintenance. The Noctua NH-D15 and be quiet! Dark Rock Pro 4 are prime examples, known for their exceptional thermal performance and quiet operation.
CPU Cooling Solutions: Air vs. Liquid
- Air Coolers: Rely on heatsinks and fans to dissipate heat. Generally more affordable, reliable, and easier to install. Performance scales with heatsink size and fan quality.
- AIO Liquid Coolers: Use a closed loop of liquid to transfer heat from the CPU to a radiator, which is then cooled by fans. Often offer superior cooling for high-end, overclocked CPUs and can look aesthetically pleasing. Require careful radiator placement within the case.
The decision between air and liquid cooling often comes down to budget, aesthetics, and the specific CPU you’re running. Extremely high-TDP (Thermal Design Power) CPUs, especially when overclocked, might benefit more from AIO liquid coolers due to their superior heat transfer capabilities. However, a well-chosen air cooler remains an excellent and often more practical solution for a wide range of processors.
For GPUs, while many high-end cards come with robust factory cooling solutions, performance can still be hampered by inadequate case airflow or by running particularly power-hungry variants. Aftermarket GPU cooling isn’t as common as CPU cooling but can involve replacing the cooler with a third-party air cooler or integrating a custom liquid cooling loop. For most users, ensuring sufficient fresh air is supplied directly to the GPU’s fans through optimal case airflow is the most effective strategy.
Remember that even with top-tier coolers, proper installation is key. Applying thermal paste correctly and ensuring secure mounting pressure are crucial for efficient heat transfer from the component to the cooler. Neglecting these steps can severely undermine even the best cooling hardware. Regular cleaning of heatsinks and fans to remove dust buildup is also vital for maintaining optimal thermal performance over time.
Effective Cable Management and Dust Control
Cables, while essential for connecting components, can become significant obstacles to efficient airflow if not managed properly. A chaotic mess of wires acts as a physical barrier, disrupting the smooth passage of air and creating pockets of stagnant hot air within the case. Effective cable management is thus not just about aesthetics; it’s a vital part of any serious cooling strategy. Similarly, dust is the insidious enemy of thermal performance, silently accumulating and acting as an insulating layer that traps heat.
When routing cables, the primary goal is to keep them out of the main airflow path. Most modern cases feature dedicated channels, cutouts, and ample space behind the motherboard tray for this purpose. Utilize zip ties, Velcro straps, and even custom braided cables to bundle and route wires neatly. Prioritize the main power cables (24-pin ATX, 8-pin EPS, PCIe power) as they are the thickest and most obstructive. Even though it might seem tedious, the time invested in careful cable management pays off in improved thermals and a cleaner-looking build.
Cable Management Best Practices
- Route behind the motherboard tray: Utilize the space between the motherboard tray and the side panel to hide most cables.
- Bundle similar cables: Group CPU power, GPU power, and SATA cables together to make them more manageable.
- Avoid blocking fans/vents: Ensure no cables obstruct fan blades or air vents.
- Use modular power supplies: These allow you to use only the cables you need, reducing clutter.
Dust control is an ongoing battle. Even with dust filters, microscopic particles will inevitably find their way into your system. These particles accumulate on heatsinks, fan blades, and component surfaces, forming thermal blankets that prevent efficient heat dissipation. A regular cleaning schedule is imperative. Depending on your environment, a monthly or quarterly clean with compressed air can make a significant difference. Pay particular attention to CPU and GPU heatsinks, as these are critical areas for heat exchange.

Beyond compressed air, consider using a soft brush or microfiber cloth for stubborn dust on fan blades. Always ensure your PC is fully powered off and unplugged before cleaning. While minor, even static electricity can pose a risk. Proactive measures such as using dust filters on all intake fans and ensuring positive case pressure can significantly reduce the rate of dust accumulation, making your cleaning efforts more effective and less frequent. These seemingly small details of cable management and dust control collectively contribute to a robust thermal environment, allowing your high-performance components to breathe and perform at their best consistently.
Environmental Factors and System Optimization
While component and case-level improvements form the backbone of thermal management, external environmental factors and system-level software optimizations also play a crucial role. Neglecting these aspects can undermine even the most meticulously built cooling setup. The ambient temperature of your room, the location of your PC, and how your operating system manages power can all contribute to or alleviate thermal throttling.
Firstly, consider your room’s temperature. A PC operating in a constantly hot room will struggle more to dissipate heat than one in a cooler environment. While not always feasible to lower ambient temperatures significantly, ensuring good room ventilation and avoiding placing your PC next to heat sources (like radiators or in direct sunlight) can make a tangible difference. Providing adequate clearance around your PC tower, especially at intake and exhaust points, is also critical. Don’t push your PC flush against a wall or tuck it into a cramped, unventilated cabinet.
Optimizing for Cooler Operation
- Room Ventilation: Ensure good airflow in your room. If possible, consider air conditioning or a fan directed near your PC during intense gaming sessions.
- PC Placement: Place your PC on a hard, elevated surface, allowing for proper airflow. Avoid carpets, which can block bottom-mounted fans.
- Power Plans: In Windows, choose a “Balanced” or “Power Saver” power plan for everyday use and switch to “High Performance” only when gaming. This can reduce CPU activity and heat when not under load.
- BIOS/UEFI Settings: Explore your motherboard’s BIOS/UEFI for fan control settings, allowing you to create custom fan curves that react dynamically to temperature changes.
Software optimizations extend beyond just power plans. Keeping your operating system and drivers up to date ensures that your hardware is running with the latest efficiencies, which can sometimes include better thermal management algorithms. Avoid unnecessary background processes during gaming, as these consume CPU cycles and generate additional heat. Even minor tweaks like disabling dynamic background effects or unnecessary startup programs can contribute to a slightly cooler and more responsive system.
Overclocking, while tempting for performance gains, should be approached with caution in the context of thermal management. Any increase in clock speed or voltage directly translates to more heat. If you choose to overclock, it must be done in conjunction with robust cooling solutions and meticulous temperature monitoring. Conversely, sometimes a slight undervolting of your CPU or GPU, or a minor downclock, can significantly reduce heat output with a minimal performance impact, if you are consistently facing thermal issues. Understanding these environmental and software levers provides a holistic approach to conquering thermal throttling, turning your gaming rig into a more robust and reliable machine.
| Key Point | Brief Description |
|---|---|
| 🌬️ Airflow Optimization | Strategic fan placement and case selection create efficient air paths to remove heat. |
| 🌡️ Component Cooling | Upgrading CPU/GPU coolers directly mitigates heat at the source, preventing throttling. |
| 🧹 Maintenance & Cable Mgmt. | Cleanliness and organized cables ensure unimpeded air movement and reduce heat traps. |
| 🌐 Environmental Factors | Room temperature and PC placement significantly impact cooling efficiency and overall performance. |
Frequently Asked Questions
▼
Thermal throttling is a protective mechanism where your CPU or GPU reduces its performance (clock speed, power draw) to lower its temperature and prevent overheating damage. It leads to noticeable frame rate drops and stuttering during demanding gaming sessions.
▼
You can use monitoring software like HWMonitor, MSI Afterburner, or HWiNFO to check CPU and GPU temperatures while gaming. If temperatures consistently reach 85-90°C (185-194°F) or higher, coupled with performance dips, your system is likely throttling.
▼
Not always. While AIO liquid coolers often offer superior performance for high-end, overclocked CPUs and can free up space around the CPU socket, high-end air coolers can provide comparable performance at a lower cost, with greater reliability and simpler maintenance.
▼
A balanced or slightly positive pressure setup is generally recommended. This involves having more intake fans (e.g., front) than exhaust fans (e.g., rear and top). This creates a directed airflow path for cool air and helps to keep dust out of the system.
▼
The frequency depends on your environment, but a general recommendation is every 3-6 months. If you have pets, live in a dusty area, or use your PC heavily, monthly or bi-monthly cleaning with compressed air can be beneficial to prevent dust buildup on heatsinks and fans.
Conclusion
Combating thermal throttling is not just about raw performance; it’s about safeguarding your investment and ensuring a consistently immersive gaming experience. By strategically selecting an airflow-optimized case, mastering sensible fan configurations, upgrading component-specific cooling, and diligently managing cables and dust, you can create a thermal environment robust enough to handle the most demanding titles. These insights, grounded in the principles of efficient heat transfer, empower you to transform your gaming rig from a hotbox of compromises into a cool, calm, and powerfully consistent machine. Invest in your PC’s health, and it will repay you with years of unthrottled, high-fidelity gaming pleasure.

