Upgrade Your PC Case for 15% Better Airflow & Lower Temps
Optimizing your PC case’s airflow and reducing internal temperatures by up to 15% significantly enhances component longevity and maintains peak gaming performance, preventing thermal throttling and improving system stability.
Are you chasing every last frame per second, or perhaps enduring system stutters and crashes during intense gaming sessions? The solution might not be a new GPU or CPU, but a crucial, often overlooked component: your PC case. A strategic upgrade your case: improve airflow and reduce temperatures by 15% can unlock hidden performance, prolong component lifespan, and provide a much smoother, more enjoyable gaming experience without major hardware overhauls.
Understanding the Thermal Battleground
Maintaining optimal temperatures inside your PC case is not merely about comfort; it’s fundamental to system stability and component longevity, especially for gaming hardware. Modern CPUs and GPUs generate significant heat, and without efficient dissipation, this heat can lead to thermal throttling, where components deliberately slow down to prevent damage. This directly translates to reduced performance and inconsistent frame rates.
The internal environment of your PC case is a delicate thermal ecosystem. Proper airflow creates a clear path for cool air to enter and hot air to exit, ensuring that every component receives adequate cooling. Without this structured movement, hot spots can form, acting as micro-furnaces that bake your expensive hardware. Even a minor improvement in temperature, like the targeted 15% reduction, can make a substantial difference in preventing premature wear and tear on sensitive electronics. It’s not just about raw power; it’s about efficient power delivery sustained over long periods, which is where effective cooling truly shines.
The Science of Airflow: Pressure and Pathways
Effective thermal management hinges on understanding air pressure and creating unobstructed pathways for air. There are two primary airflow configurations: positive pressure and negative pressure.
- Positive Pressure: More air enters the case than exits. This helps prevent dust ingress, as air is forced out through small openings, but can lead to slightly higher internal temperatures if exhaust is insufficient.
- Negative Pressure: More air exits the case than enters. This clears hot air effectively but can draw dust into the system through unfiltered openings.
- Balanced Pressure: An ideal state where intake and exhaust are carefully balanced, maximizing cooling while minimizing dust.
Achieving the ideal setup often involves trial and error, but the core principle remains consistent: ensure a clear, well-defined path for air to move from the coolest point of entry to the warmest point of exit. Obstructions like tangled cables or poorly placed components can turn an otherwise well-designed case into a thermal bottleneck, negating the benefits of high-performance fans or coolers.
Choosing the Right Case: More Than Just Aesthetics
The PC case is often seen as a mere enclosure or a style statement, but its design profoundly influences cooling performance. Selecting the right case is the first and arguably most critical step in achieving superior airflow and reduced temperatures. Look beyond flashy RGB lighting and consider structural elements that facilitate thermal efficiency.
Key Factors in Case Selection
A good case designed for airflow prioritizes mesh panels, ample fan mounts, and intelligent internal layouts.
- Mesh Front Panels: Unlike solid front panels that restrict airflow, mesh designs allow large volumes of cool air to enter the case directly, feeding fresh air to your intake fans.
- Ample Fan Mounts: More fan mounts (especially for larger 140mm or even 120mm fans) provide greater flexibility in configuring intake and exhaust, allowing you to optimize air pressure and flow direction.
- PSU Shroud: A dedicated shroud for the power supply unit helps compartmentalize heat, preventing the PSU’s exhaust from recirculating within the main chamber and improving overall aesthetic by hiding cables.
- Cable Management: Integrated cable routing channels and tie-down points are crucial. Organized cables reduce obstructions, allowing air to flow freely through the case rather than being impeded by a chaotic spaghetti of wires.
Don’t underestimate the internal layout. Cases with a smart design offer clear pathways from front intake to rear exhaust, minimizing impedance from drive cages, motherboard trays, or even front I/O cables. A wider case might also offer more space behind the motherboard tray for cable management, further aiding airflow.
Strategic Fan Placement and Configuration
Once you have an airflow-optimized case, the next crucial step is placing your fans strategically. It’s not just about adding more fans; it’s about intelligent placement to create an optimal airflow path and pressure differential within the case. This is where you can begin to see noticeable temperature drops.
Intake vs. Exhaust: The Push-Pull Dynamic
The fundamental principle of case fan setup involves intake and exhaust fans working in harmony.
- Intake Fans: Typically mounted at the front or bottom of the case, these fans pull cool ambient air into the system. For most setups, having at least two intake fans is beneficial.
- Exhaust Fans: Commonly located at the rear or top of the case, these fans push hot air out. A single rear exhaust fan is standard, and top-mounted fans are highly effective for removing rising hot air.
The goal is to create a constant, unidirectional flow of air. Imagine a wind tunnel where air enters from one end and exits from the other, picking up heat along the way. This prevents hot air from recirculating within the case, which is a common cause of elevated temperatures. Experiment with fan speeds; sometimes, a slightly lower RPM on intake fans can create enough positive pressure to keep dust out while maintaining excellent cooling.
Fan Size and Type Considerations
Larger fans generally move more air at lower RPMs, resulting in quieter operation. 140mm fans are often preferred over 120mm where space permits for this reason. Static pressure fans are designed to push air through restrictive elements like radiators or tight mesh, while airflow-optimized fans are better for open areas. A balanced mix, where appropriate, can fine-tune your cooling performance to perfection, contributing directly to that 15% temperature reduction target.
Demystifying CPU Coolers: Air vs. Liquid
Your CPU is often the hottest component in your system, and its cooler plays a paramount role in overall case temperatures. Choosing between air and liquid cooling (AIO – All-in-One) has significant implications for your case’s thermal dynamics.
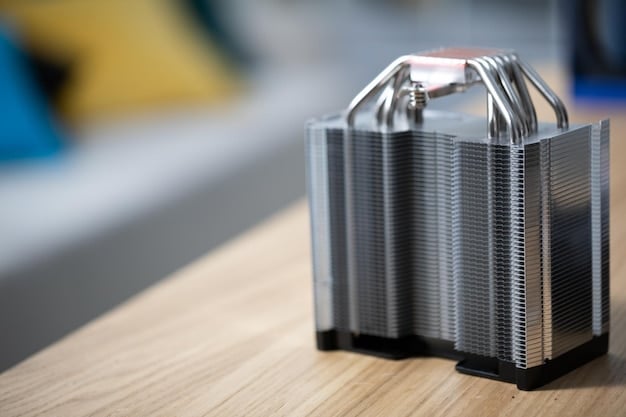
Air Coolers: Robust and Reliable
Air coolers use heat pipes to transfer heat from the CPU to a large fin stack, which is then cooled by one or two fans. They are generally more affordable, easier to install, and have fewer points of failure compared to liquid coolers. A high-performance air cooler can dissipate a surprising amount of heat, often rivaling basic AIOs. Their main disadvantage is their size; large air coolers can sometimes impede access to RAM slots or VRM heatsinks. However, a quality air cooler can be a fantastic way to contribute to that 15% temperature reduction without breaking the bank.
Liquid Coolers (AIOs): Superior Heat Dissipation
AIO liquid coolers move heat from the CPU via a cold plate to a radiator, which is then cooled by fans. They excel at dissipating large amounts of heat, making them ideal for high-end CPUs, especially those that are overclocked. The radiator can be mounted at the front, top, or rear of the case, influencing overall airflow.
- Front-mounted Radiator: Acts as an intake, bringing cool air to the radiator first. This provides excellent CPU cooling but means slightly warmer air is introduced into the case for other components.
- Top-mounted Radiator: Typically configured as exhaust, expelling hot air directly out of the case. This is often the preferred setup as it prevents warm air from being recirculated.
- Rear-mounted Radiator: Less common, usually for single-fan AIOs. Functions as an exhaust.
While AIOs offer superb thermal performance for the CPU, integrating them correctly into your case’s overall airflow strategy is crucial. A poorly placed AIO can sometimes impede the 15% temperature reduction goal for other components if it disrupts the main airflow path.
Cable Management: The Unsung Hero of Airflow
Cable management often ranks low on a PC builder’s priority list, seen as a cosmetic concern rather than a performance factor. However, tangled cables are a significant impediment to airflow, creating unexpected pockets of stale, hot air. Effective cable management is a simple, cost-effective way to contribute significantly to that 15% temperature reduction.
Strategies for Taming the Cable Beast
The goal is to move cables out of the main airflow path.
- Modular Power Supplies: These allow you to use only the cables you need, reducing clutter.
- Routing Channels and Tie-downs: Most modern cases include cutouts and tie-down points behind the motherboard tray. Utilize these extensively to route cables.
- Velcro Straps over Zip Ties: Velcro straps are reusable and adjustable, making future upgrades or troubleshooting much easier.
- Fan Hubs and RGB Controllers: Consolidate fan and RGB connections to minimize individual cables running across the motherboard.
A tidy interior means less impedance for air movement. When air can flow freely, components like your GPU and RAM receive a consistent supply of cool air, preventing them from heating up unnecessarily. This seemingly minor tweak can cumulatively lead to several degrees Celsius improvement in overall case temperature, directly supporting the goal of a 15% reduction.
Beyond Fans: Supplementary Cooling Solutions
While fans and CPU coolers form the core of your cooling strategy, several supplementary solutions can further enhance airflow and help you reach that optimal 15% temperature reduction. These often act as fine-tuning elements for specific hot spots or overall case efficiency.
Additional Cooling Tactics
Consider these options to further optimize your PC’s thermal performance:
- Thermal Paste Upgrade: Replacing stock or old thermal paste on your CPU (and even GPU, if comfortable) with a high-quality compound can shave off a few degrees. This ensures maximum heat transfer from the processor to its cooler.
- Dust Filters: While not directly cooling components, clean dust filters are essential for maintaining airflow. Blocked filters severely restrict intake, leading to higher temperatures. Regular cleaning is a must.
- Undervolting: For both CPUs and GPUs, undervolting can significantly reduce heat output while maintaining nearly identical performance. It’s a method of feeding less power to the component without sacrificing clock speed, making it run cooler and more efficiently.
- Hiding Hard Drives: If your case has optional drive bays, consider relocating traditional HDDs to areas that don’t obstruct airflow, especially in the front intake path. NVMe SSDs, being smaller, don’t pose this issue.
- PCIe Slot Covers: Ensure all unused PCIe slots at the rear of your case have covers. Missing covers create uncontrolled exhaust points, disrupting the intended airflow path and potentially drawing in unfiltered air or hot air from other components.
- Open Air Test Bench (Temporary): If you’re struggling to identify persistent hot spots, temporarily moving your components to an open air test bench can help you observe and diagnose airflow issues without the constraints of a case.
These supplementary measures can collectively contribute to the objective of significantly lowering your PC’s internal temperatures and maximizing the efficiency of your primary cooling solutions. Each small improvement adds up, making your system more robust and reliable under load.
Routine Maintenance and Long-Term Performance
Achieving an initial 15% temperature reduction is a great starting point, but maintaining that performance over time requires consistent routine maintenance. Dust is the mortal enemy of PC cooling, acting as an insulator and airflow blocker. Proper care ensures your investment continues to perform at its peak.
The Pillars of Sustained Cooling
Regular upkeep is non-negotiable for long-term thermal efficiency.
- Regular Dusting: At least once every few months, use compressed air to blast dust from fans, heatsinks, and filters. Always hold fan blades still when doing so to prevent damage to the bearings.
- Filter Cleaning: Most cases have removable, washable dust filters. Clean them frequently, especially if your environment is dusty. Clogged filters are the quickest way to choke your system’s airflow.
- Monitoring Temperatures: Use software like HWMonitor or MSI Afterburner to constantly monitor your CPU and GPU temperatures. This helps you identify trends and catch potential issues before they become critical.
- Reapplying Thermal Paste: While not a frequent task, thermal paste can dry out over several years, becoming less effective. Consider reapplying fresh thermal paste to your CPU and GPU every 3-5 years, or if you notice a significant increase in idle temperatures.
By integrating these practices into your routine, you ensure that the benefits gained from your initial case and fan upgrades are sustained, keeping your system cool, quiet, and performant for years to come. This proactive approach not only extends component lifespan but also upholds your gaming performance, making every session smooth and responsive.
| Key Improvement Areas | Brief Description |
|---|---|
| 🌬️ Case Selection & Layout | Choosing cases with mesh panels and intelligent internal design maximizes passive and active airflow. |
| ⬆️ Strategic Fan Placement | Optimizing intake/exhaust fans creates effective air pressure for heat dissipation. |
| 🧽 Cable Management | Neat cable routing reduces obstructions, allowing air to flow freely within the case. |
| 🧼 Routine Maintenance | Regular dusting and filter cleaning prevent heat buildup and maintain optimal airflow over time. |
Frequently Asked Questions
▼
Ideally, you should clean your PC case for dust every 3 to 6 months, or more frequently if you live in a dusty environment, have pets, or use your PC extensively. Regular cleaning of dust filters and internal components with compressed air prevents insulation and airflow restriction, which are critical for maintaining low temperatures and system efficiency.
▼
Yes, you can absolutely mix different fan sizes (e.g., 120mm and 140mm) in your PC case, provided your case has mounts for them. In fact, it’s often beneficial to use larger fans in areas where greater airflow is needed at lower noise levels, such as front intakes, while smaller fans might be used for specific exhaust points like the rear. The key is to maintain balanced air pressure for optimal cooling.
▼
Not always. While high-end AIO liquid coolers generally offer superior thermal dissipation for very hot CPUs or overclocked systems, a well-designed, high-performance air cooler can often match or even outperform entry-level liquid coolers. Air coolers are also typically more reliable due to fewer moving parts and no risk of leaks. The “better” option depends on your specific CPU, case, and budget considerations.
▼
Thermal throttling is a safeguarding mechanism where your CPU or GPU automatically reduces its operating speed (clock frequency) when it reaches a critical temperature to prevent damage. This results in noticeable performance drops, stutters, and lower frame rates during gaming. Improved airflow efficiently dissipates heat, keeping components below their throttling thresholds, thus maintaining peak performance and stability.
▼
Yes, effective cable management significantly impacts PC temperatures. Unorganized cables create physical obstructions within the case, impeding the smooth flow of air from intake to exhaust. This can lead to hot air pockets and reduced cooling efficiency over vital components like the GPU and motherboard VRMs. By routing cables neatly, you ensure unobstructed airflow, contributing to lower overall system temperatures.
Conclusion
Optimizing your PC case for superior airflow and reduced temperatures is an investment that pays dividends in performance, longevity, and overall user experience. By making informed choices about your case, strategically placing fans, practicing meticulous cable management, and adhering to a routine maintenance schedule, you can unlock a substantial improvement in your system’s thermal efficiency. This proactive approach ensures your gaming hardware consistently operates at its best, free from the shackles of thermal throttling, delivering a smoother, more reliable computing experience for years to come.


