Custom Water Cooling PC: Zero to Hero Build Guide
A custom water cooling loop dramatically enhances gaming PC performance and longevity by efficiently dissipating heat, allowing for superior overclocking and quieter operation, transforming a standard build into a high-performance, visually appealing machine, and represents a significant upgrade for enthusiasts seeking peak optimization.
Venturing into the world of custom water cooling can seem daunting, but the rewards—superior thermal management, enhanced aesthetics, and a quieter gaming experience—are undeniable. This guide, From Zero to Hero: Building a Custom Water Cooling Loop for Your Gaming PC, aims to demystify the process, providing a comprehensive roadmap from initial concept to a fully operational, high-performance liquid-cooled system.
The Basics of Custom Water Cooling: Why Bother?
Understanding the fundamental principles of custom water cooling is the first step toward appreciating its benefits and tackling a build. Unlike air cooling, which relies on finned heatsinks and fans to dissipate heat, liquid cooling uses a fluid (coolant) to transfer heat away from components like the CPU and GPU much more efficiently. This transferred heat is then expelled from the system via a radiator, resulting in significantly lower operating temperatures.
The primary advantage of custom water cooling lies in its superior thermal performance. Lower temperatures mean components can operate closer to their maximum potential without throttling, leading to sustained high frame rates and improved stability during intense gaming sessions. Furthermore, the increased thermal headroom often allows for more aggressive overclocking, pushing your CPU and GPU beyond their factory specifications for even greater performance gains. This granular control over temperature ensures longevity and consistent performance for high-end gaming hardware.
Beyond performance, noise reduction is another compelling reason. While high-performance air coolers can be effective, they often require larger, faster-spinning fans to handle the heat output of powerful components, leading to a noticeable hum. A well-designed custom water loop, with its larger radiators and slower-spinning fans, can achieve better cooling with significantly less noise, providing a more immersive and quiet gaming environment. The aesthetic appeal is also a major draw, with transparent tubing, colorful coolants, and custom lighting offering a personalized, show-stopping PC build. It transforms a functional machine into a work of art.
Air vs. Water: A Thermal Showdown
The debate between air and water cooling often boils down to performance versus simplicity. Air coolers are generally easier to install and more budget-friendly, making them attractive for entry-level and mid-range builds.
- Air Cooling: Cost-effective, simpler installation, adequate for most users.
- AIO Liquid Cooling: Better performance than air, easier than custom loops, sealed unit.
- Custom Liquid Cooling: Best thermal performance, highly customizable, complex installation.
Custom water cooling, while demanding more initial investment and effort, offers unparalleled thermal solutions for enthusiasts and extreme users. This system can isolate heat sources, allowing for fine-tuned temperature management across the entire chassis. The ability to cool multiple components within a single loop makes it a comprehensive solution for high-end setups.
In essence, choosing custom water cooling is an investment in optimized performance, reduced noise, and a unique aesthetic, fundamentally transforming your gaming PC experience from an ordinary setup to a truly “hero” machine.
Planning Your Loop: Components and Compatibility
The success of your custom water cooling adventure hinges on meticulous planning and understanding component compatibility. This stage involves selecting the right parts that will integrate seamlessly and deliver the desired performance and aesthetics. Rushing this step can lead to costly mistakes or suboptimal performance.
The core components of any custom water loop include the pump, radiator, CPU block, GPU block (if cooling the GPU), reservoir, tubing, fittings, and coolant. Each plays a critical role in the system’s efficiency and longevity. The size and number of radiators, for instance, are proportional to the heat output of your components and the space available in your PC case. More powerful CPUs and GPUs, especially if overclocked, will demand larger or multiple radiators for effective heat dissipation.
Key Components Explained
Before purchasing, it’s essential to grasp what each component does and how it affects the system.
- Water Blocks: These are custom-engineered metal plates that sit directly on your CPU and/or GPU, transferring heat from the chip to the circulating coolant. Ensure compatibility with your specific CPU socket (e.g., LGA1700, AM5) and GPU model (e.g., RTX 4090, RX 7900 XTX).
- Radiators: Composed of fins and channels, radiators dissipate heat from the coolant into the ambient air, typically aided by fans. They come in various sizes (e.g., 120mm, 240mm, 360mm, 480mm) and thicknesses. The larger the radiator surface area, the more heat it can dissipate.
- Pump & Reservoir: The pump circulates the coolant through the loop, while the reservoir holds excess coolant, aids in filling the loop, and helps in bleeding air bubbles. Many units combine these two functions into a single pump-res combo for efficiency and space-saving.
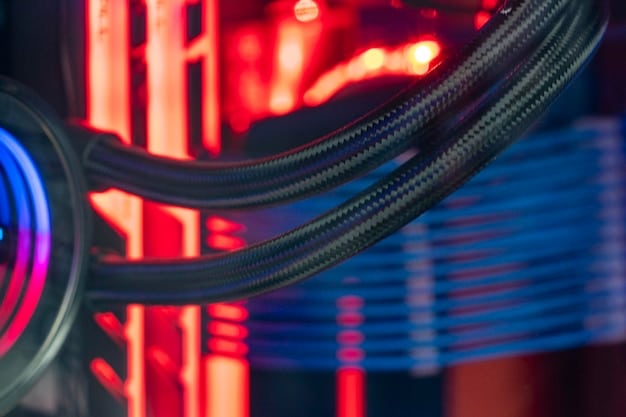
- Tubing & Fittings: Tubing can be soft (flexible PVC/EPDM) or hard (rigid Acrylic/PETG/Glass). Hard tubing offers a cleaner aesthetic but is more challenging to bend and install. Fittings (compression, barb, rotary) connect the tubing to the components, ensuring leak-free connections.
- Coolant: Specialized coolants prevent algae growth and corrosion, and some come in various colors for aesthetic customization. Distilled water with a biocide and corrosion inhibitor is a common, cost-effective choice.
Compatibility checking is paramount. Use online configurators or consult forums/communities dedicated to water cooling. Double-check the radiator space in your case, ensuring there’s enough clearance for fans and the radiator itself. Verify that your chosen water blocks are indeed compatible with your specific CPU socket and GPU model. Small discrepancies can lead to significant headaches during assembly.
Beyond technical compatibility, consider the aesthetic impact of your choices. Will the tubing style, coolant color, and water block design complement your overall PC build theme? Planning for future upgrades is also wise; choosing larger radiators or a more powerful pump now can save you from having to replace components later if you decide to add another GPU or upgrade to a hotter CPU.
The planning phase also involves budgeting. Custom water cooling can be an expensive endeavor, especially for high-end components. Prioritize essential components and allocate funds accordingly. Carefully consider the trade-offs between performance, aesthetics, and cost to build a loop that meets your specific needs and expectations.
Tools and Preparation: Gearing Up for the Build
Before you begin assembling your custom water cooling loop, having the right tools and a properly prepared workspace is crucial. This not only streamlines the building process but also minimizes the risk of damage to your expensive components. A well-organized environment reduces stress and helps prevent common mistakes, ensuring a smooth and successful build.
Your workspace should be clean, well-lit, and antistatic. Static electricity can wreak havoc on electronic components, so an anti-static mat and wrist strap are highly recommended. Clear any clutter to provide ample room for maneuvering your PC case and components. Having all your tools readily accessible will save time and frustration.
Essential Tools for Water Cooling
While the exact tools may vary slightly depending on your chosen tubing type (soft vs. hard), some are universally beneficial:
- Screwdriver Set: A good set of Phillips head screwdrivers (various sizes) for mounting components and opening your PC case.
- Anti-static Mat & Wrist Strap: Crucial for protecting sensitive electronic components from electrostatic discharge.
- Tube Cutter: For soft tubing, a sharp utility knife or tubing cutter; for hard tubing, a specialized rotary cutter or saw for clean, straight cuts.
- Heat Gun (for hard tubing): Essential for bending PETG or Acrylic tubing. Practice on scrap pieces first.
- Bending Inserts (for hard tubing): Silicone inserts prevent tubing from kinking during heating and bending.
- Measuring Tape/Ruler: For precise tube length measurements.
- Lint-Free Cloths & Isopropyl Alcohol: For cleaning thermal paste and surfaces.
- Funnel & Squeeze Bottle: For easier and mess-free coolant filling.
- Paper Towels & Distilled Water: For immediate cleanup of spills and flushing the system.
- Leak Tester (optional but recommended): A pressure tester can verify loop integrity before introducing coolant, saving you from potential leaks and component damage.
Beyond the physical tools, mental preparation is equally important. Take your time, read the manuals for each component, and watch build guides if you’re feeling uncertain. Don’t be afraid to pause and re-evaluate if something doesn’t feel right. Patience is a virtue in custom water cooling.
Before physically installing anything, it’s often beneficial to perform a “mock-up” or dry run. Place your components within the case to visualize the tubing runs, identify potential clearance issues, and plan the most efficient and aesthetically pleasing path for your loop. This foresight can prevent unnecessary rework and reduce material waste, especially with rigid tubing.
Finally, ensure you have plenty of paper towels or an absorbent cloth nearby. Spills are a common occurrence during the filling and leak testing phases, and quick cleanup is essential to prevent damage. A clean, organized, and well-equipped workspace sets the stage for a successful and satisfying water cooling build.
Assembly: Step-by-Step Loop Construction
With all your components and tools at hand, it’s time for the most exciting part: assembling your custom water cooling loop. This process requires precision, patience, and attention to detail. Rushing through any step could lead to leaks or suboptimal performance.
Before beginning, ensure your PC components (CPU, GPU) are already installed in your motherboard and that the motherboard is mounted in the case. It’s often easier to install the water blocks on the CPU and GPU before mounting them within the case, especially for the GPU.
The Order of Operation
- Install Water Blocks: Begin by carefully installing the CPU and GPU water blocks. This involves cleaning off any old thermal paste, applying new paste correctly, and mounting the blocks according to the manufacturer’s instructions. Ensure firm, even pressure.
- Mount Radiators and Fans: Secure your radiators and their respective fans in their designated spots within the PC case. Pay attention to fan orientation (intake or exhaust) for optimal airflow.
- Install Pump and Reservoir: Mount your pump and reservoir (or pump-res combo) securely in its chosen location. Ensure it’s easily accessible for filling and maintenance.
- Plan Your Loop Path: Visualize the entire loop’s flow. A typical loop flows from the reservoir to the pump, then to the CPU block, then to the GPU block, then to the radiators, and finally back to the reservoir. While the order of components after the pump generally doesn’t drastically affect cooling performance (as long as there’s enough radiator surface area), maintaining a logical flow simplifies tube routing and troubleshooting.
- Tubing Installation: This is arguably the most challenging and rewarding step.
- Soft Tubing: Cut tubing to length, attach fittings, and push tubing onto barbs or secure with compression fittings. Ensure a snug, secure fit.
- Hard Tubing: Measure, cut, and bend each piece of tubing precisely using a heat gun and bending inserts. Take your time, practice on scrap pieces, and aim for clean, consistent bends. Attach compression fittings securely.
- Leak Testing (Air Pressure): Before introducing coolant, connect all fittings and tubes. If you have a leak tester, use it to pressurize the loop and check for a pressure drop over 15-30 minutes. This is a crucial step to catch leaks early.
When installing fittings, remember not to overtighten them, especially with plastic components, as this can cause cracking. Hand-tight is usually sufficient, followed by a slight turn with a wrench if specified by the manufacturer.
Throughout the assembly, continuously check clearances, especially around RAM, motherboard heatsinks, and case panels. A well-planned loop minimizes stress on fittings and tubes, contributing to long-term reliability. Maintain a clean workspace to avoid dust and debris entering the loop. This iterative process of installing, checking, and adjusting will lead to a successful and visually appealing custom loop.
Filling, Bleeding, and Leak Testing
Once your loop is physically assembled, the critical steps of filling, bleeding air, and thorough leak testing begin. These processes ensure your system operates safely and efficiently. Skipping or rushing any of these stages can lead to catastrophic leaks and damage to your components.
Before filling, ensure all electrical components of your PC are completely disconnected from the power supply, except for the pump. It’s highly recommended to use a PSU jump starter (a paperclip bent into a U-shape bridging the green and a black wire on the 24-pin ATX connector) to power only the pump, isolating it from the rest of your system. This prevents accidental short circuits if a leak occurs.
The Filling Process
- Prepare Coolant: Pour your chosen coolant into a squeeze bottle or directly into your reservoir using a funnel.
- Begin Filling: Slowly fill the reservoir. Once the reservoir is partially full, turn on the pump (using the PSU jump starter). The coolant will begin to circulate through the loop.
- Refill and Cycle: As the coolant circulates, the reservoir level will drop as air is displaced. Continuously refill the reservoir to prevent the pump from running dry, which can damage it.
- Tilt and Gently Shake: To help dislodge air bubbles trapped in radiators or water blocks, gently tilt and rock your PC case from side to side. Avoid aggressive movements that could strain tubing or fittings.
- Cycle Repeatedly: Allow the pump to run for several minutes, observing the flow and the release of air bubbles into the reservoir. Repeat step 3 and 4 until no more bubbles are visible entering the reservoir and the coolant flow appears consistent. This bleeding process can take several hours, sometimes even overnight, for all air to escape.
During the initial filling, closely inspect every fitting and connection point for any signs of leakage. Even a tiny drip can become a significant problem over time. Use paper towels to blot around connections; any moisture indicates a leak.
The Leak Testing Phase
Once you believe the loop is fully bled and visually leak-free, perform an extended leak test. Power the pump continuously (using the PSU jump starter) for at least 12-24 hours. During this period:
- Periodically check all fittings and connections for moisture.
- Observe the coolant level in the reservoir; a significant drop could indicate a slow leak.
- Place paper towels or absorbent material under potential leak points.
Do NOT connect power to your motherboard, GPU, or any other PC components during this extended leak test. Only after a minimum of 12-24 hours of successful leak testing—with absolutely no signs of moisture or level drops—should you proceed to connect all power cables to your PC. This meticulous approach minimizes the risk of damage, ensuring your custom water cooling loop is ready to perform safely and reliably.
Maintenance and Best Practices for Longevity
Building a custom water cooling loop is just the first step; proper maintenance is crucial for ensuring its longevity, performance, and the safety of your expensive components. Neglecting maintenance can lead to coolant degradation, component corrosion, and ultimately, system failure. Regular upkeep will keep your “hero” PC running smoothly for years to come.
The primary aspects of maintenance involve regular inspection, coolant replacement, and cleaning of components. The frequency of these tasks depends on various factors, including the type of coolant used, the operating environment, and the quality of your components.
Key Maintenance Practices
- Regular Visual Inspection: At least once a month, visually inspect your loop for any signs of leaks, discoloration of coolant, or particulate accumulation. Check tubing for hazing or plasticizer leaching (a common issue with certain soft tubing types that can clog blocks).
- Coolant Replacement: Most coolants are recommended to be replaced every 6-12 months, though some long-life coolants might extend this to 2 years. Colored coolants, especially pastel or opaque ones, tend to require more frequent changes due to sediment dropout.
- Drain the Loop: Use a drain port or carefully disconnect tubing to drain the old coolant into a suitable container.
- Flush the System: Fill the loop with distilled water and let the pump run for a few hours (or overnight) to flush out any remaining old coolant or debris. Repeat this flushing process several times until the water runs clear.
- Refill with New Coolant: Follow the filling and bleeding steps similar to the initial build.
- Component Cleaning: Over time, some coolants can leave residue in water blocks or radiators. Every 1-2 years, or if you notice performance degradation, consider disassembling your water blocks for manual cleaning. Use a soft brush and distilled water to gently remove any buildup. Radiators can be flushed with distilled water or specialized cleaning solutions.
Avoid mixing different types of coolants unnecessarily, as chemical incompatibility can lead to precipitation or corrosion. Always use coolants specifically designed for PC water cooling, as automotive or other industrial coolants contain additives that can harm your components. Distilled water with a biocide and corrosion inhibitor remains a reliable and low-maintenance option.
Maintaining proper airflow within your case is also vital. Regularly clean dust filters and fan blades to ensure efficient heat dissipation from your radiators. A clean PC environment significantly contributes to the health and longevity of your water cooling loop.
By adhering to these maintenance best practices, you can ensure your custom water cooling loop continues to deliver optimal performance, extend the lifespan of your high-end gaming hardware, and maintain the pristine aesthetics of your custom-built system.
Performance Through Optimization and Tuning
Once your custom water cooling loop is built, leak-tested, and running, the journey doesn’t end there. Optimizing and tuning your system is where you truly transform your “zero” build into a “hero” machine. This involves tweaking settings to maximize thermal performance, achieve stable overclocks, and minimize noise, allowing your gaming PC to reach its full potential.
The primary goal of optimization is to find the sweet spot where you have excellent cooling performance without excessive fan noise. This often involves balancing fan speeds, pump speeds, and thermal paste application.
Key Optimization Strategies
- Fan Curve Tuning: This is one of the most impactful adjustments. In your motherboard’s BIOS or using fan control software, create custom fan curves for your radiator fans.
- Monitor Temperatures: Run demanding benchmarks or games while monitoring your CPU and GPU temperatures.
- Adjust Fan Speeds: Start with lower fan speeds at idle/low temperatures and gradually increase them as temperatures rise. Aim for a curve that keeps temperatures in check under load without becoming unnecessarily loud.
- Iterate and Refine: It’s an iterative process; experiment to find the optimal balance for your specific system and noise tolerance.
- Pump Speed Settings: While pumps generally operate best at higher speeds for maximum flow, some pumps can be slightly throttled down if noise is a concern, provided it doesn’t significantly impact temperatures. Monitor flow rate and temperatures when adjusting pump speed. Most users find a constant, moderate pump speed to be sufficient and quiet.
- Overclocking for Enhanced Performance: With superior cooling, you gain headroom for overclocking your CPU and GPU.
- Gradual Increments: Increase core clocks and memory frequencies in small increments.
- Stress Testing: After each increment, run stability tests (like Cinebench, Prime95 for CPU; FurMark, Heaven Benchmark for GPU) to ensure stability and monitor temperatures.
- Voltage Adjustment: Minor voltage adjustments might be necessary for stability, but this increases heat, so proceed with caution.
- Thermal Paste Application: While typically done once during block installation, ensuring proper thermal paste application is critical. Using a high-quality thermal paste and an effective application technique (e.g., a small dot for CPU, thin spread for GPU) provides efficient heat transfer from the chip to the water block. Periodically checking this during maintenance can be beneficial.
Software monitoring tools (like HWMonitor, MSI Afterburner, HWiNFO) are indispensable for tracking temperatures, fan speeds, and clock frequencies in real-time. Consistent monitoring helps you identify bottlenecks or areas for further improvement. Remember, every system is unique, and what works for one may not be ideal for another. Patience and experimentation are key to unlocking the full potential of your custom water-cooled gaming PC.
The goal is a stable, high-performing system that runs quietly even under heavy loads, providing a truly immersive gaming experience. By meticulously tuning your fan curves and exploring safe overclocking limits, you can transform your powerful hardware into an optimized powerhouse, leveraging every advantage that custom water cooling offers.
| Key Aspect | Brief Description |
|---|---|
| 💧 Enhanced Cooling | Custom loops provide superior thermal management for CPU/GPU, enabling higher performance. |
| 🛠️ Component Selection | Careful matching of blocks, radiators, pump, and tubing ensures compatibility and desired aesthetics. |
| 🧪 Leak Testing Critical | Thorough air pressure and 24-hour liquid leak testing are essential to prevent damage. |
| 🔧 Ongoing Maintenance | Regular coolant changes and system checks prolong the loop’s lifespan and performance. |
Frequently Asked Questions About Custom Water Cooling
▼
While challenging, custom water cooling is an achievable project for beginners with patience and careful research. Start with soft tubing, follow guides meticulously, and prioritize thorough leak testing to minimize risks. The learning curve is steep, but the reward is a highly optimized and visually stunning PC.
▼
Most manufacturers recommend changing coolant every 6 to 12 months. Opaque and pastel coolants may require more frequent changes due to particle fall-out. Regularly inspecting your coolant for discoloration or cloudiness will help determine the optimal replacement schedule for your specific setup and usage patterns.
▼
Yes, cooling both your CPU and GPU in a single loop is a common and often preferred setup for custom water cooling enthusiasts. Ensure you have sufficient radiator surface area to dissipate the combined heat load from both components. This typically means using larger or multiple radiators for efficient cooling.
▼
Soft tubing is flexible, easier to install, and more forgiving of measurement errors, making it ideal for beginners. Hard tubing, made of rigid materials like Acrylic or PETG, requires bending with a heat gun and offers a cleaner, more aesthetic look but is more challenging to work with. Both offer excellent performance.
▼
Disassembling your CPU or GPU to install a water block typically voids the warranty on that specific component. Some manufacturers are more lenient than others regarding water cooling. It’s crucial to check the warranty policy of your specific CPU and GPU manufacturers before proceeding with custom water cooling.
Conclusion
Embarking on the journey of building a custom water cooling loop for your gaming PC is a testament to dedication and a desire for ultimate performance. From meticulously planning your component compatibility to the precise assembly, rigorous leak testing, and ongoing maintenance, each step transforms your standard machine into a personalized high-performance marvel. The benefits—significantly lower temperatures, the potential for aggressive overclocking, and a dramatic reduction in noise—culminate in an unparalleled gaming experience. While it demands patience and attention to detail, the satisfaction of creating a liquid-cooled “hero” PC that not only excels in performance but also stands as a unique aesthetic statement is profoundly rewarding. Embrace the challenge, and unlock the true potential of your gaming rig.


